14. Mishmash Drawing <<< Contents >>> 16. Dialogs
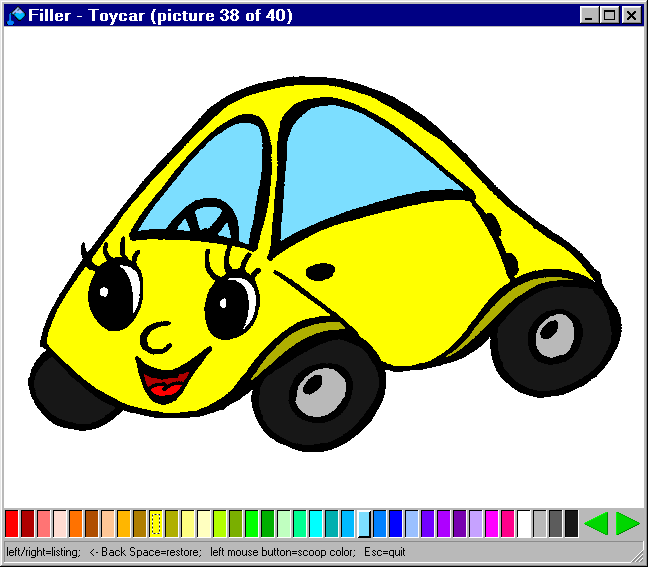
Our next task in the world of Peter the rabbit is to create a graphical editor enabling the user to fill colors into prepared pictures. During that, we will learn how to work with the mouse and with files. The program should work like this: It will find all pictures (BMP files) in its folder. The user can browse through the pictures, and add colors by filling areas. Black will be reserved for the outlines of the pictures.

Let us say a few words about files and
folders. A file is a separated piece of data stored in the
computer. It can be a picture, a letter, a spreadsheet, or a
program. User data files are often called documents. A folder is a "pack of files". Folders are similar
to groups ![]() in
Peter. If we want to express the location of a file or a folder
on the disk, we use a notation called path. A path is a list of folders (sometimes also with
the disk) through which we have to go to get to the file
(folder). They are separated by backslashes "\". For example: C:\Program Files\Peter\Peter.exe. Notice that the disk is labeled by a letter and a
colon. At the end of the path, you can see a program name. This
notation is called full
file name. It contains the
disk, the folders, the file name, and the extension of the file
name. The file
name extension is the part
behind the dot, and it specifies the file type. For example, the EXE extension labels programs.
in
Peter. If we want to express the location of a file or a folder
on the disk, we use a notation called path. A path is a list of folders (sometimes also with
the disk) through which we have to go to get to the file
(folder). They are separated by backslashes "\". For example: C:\Program Files\Peter\Peter.exe. Notice that the disk is labeled by a letter and a
colon. At the end of the path, you can see a program name. This
notation is called full
file name. It contains the
disk, the folders, the file name, and the extension of the file
name. The file
name extension is the part
behind the dot, and it specifies the file type. For example, the EXE extension labels programs.
First, create a new program called Filler ![]() , or
use the sample program prepared in Peter.
, or
use the sample program prepared in Peter.
We will adjust the size of the sheet. We will edit pictures with a standard size of 20 x 15 squares (640 x 480 graphical points). To select colors and pictures, we need a bar with the height of one square in the bottom of the window. For this reason, set the size of the program main sheet to 20 x 16 squares. It is still a good size for the screen mode of 800 x 600 points. This screen mode (video mode), but preferably higher, is also the recommended minimum for the users of our programs.
Create two new items — left arrow ![]() and
right arrow
and
right arrow ![]() .
Into them, paint the pictures of control buttons for browsing to
the left and right. The background will be gray. Lay the items
into the bottom right corner of the sheet, as on the previous
picture.
.
Into them, paint the pictures of control buttons for browsing to
the left and right. The background will be gray. Lay the items
into the bottom right corner of the sheet, as on the previous
picture.
Create the main program loop — a
never-ending conditional
repeating ![]() (the cycle condition
will contain a yes
(the cycle condition
will contain a yes ![]() element). The cycle body will contain one wait
element). The cycle body will contain one wait ![]() command.
command.
In front of the main program loop, prepare a group called program initialization. It will contain the preparatory operations required to run the program.
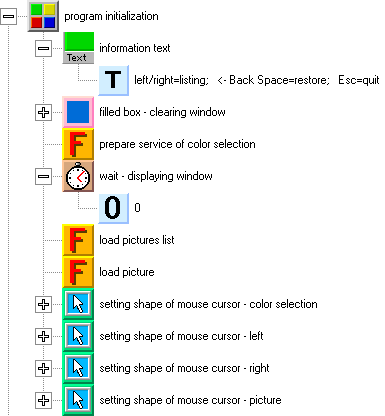
The first command will set the help text into the status bar in the bottom of the window. If the status bar does not contain any text, it is turned off. If you want to use the status bar, it is recommended to turn it on in the beginning of the program. It does not look well when the program window appears first and the status bar only a few moments later.
Tip: If you want to use an empty status bar, display the space character.
The second command will fill the program
window with white color. In the filled box
![]() command, use just
one parameter — the white color. If we skip the remaining
parameters, we will fill the whole window. This command ensures
that black background does not show through during the loading of
the list of pictures and before displaying the first picture. It
is used for purely aesthetical reason, but in general, the
transitory states of programs should not be neglected. Small
negative impressions can build the users' attitudes to programs.
If something wrong can be seen, the user does not trust the
program. The same thing happens when the program does not react
to user actions quickly enough, or when the user does not know
how to control it. Even worse effects arise when an intuitive
command leads to unexpected and undesired results.
command, use just
one parameter — the white color. If we skip the remaining
parameters, we will fill the whole window. This command ensures
that black background does not show through during the loading of
the list of pictures and before displaying the first picture. It
is used for purely aesthetical reason, but in general, the
transitory states of programs should not be neglected. Small
negative impressions can build the users' attitudes to programs.
If something wrong can be seen, the user does not trust the
program. The same thing happens when the program does not react
to user actions quickly enough, or when the user does not know
how to control it. Even worse effects arise when an intuitive
command leads to unexpected and undesired results.
The third command is a prepare service of color selection function. It will define the colors for drawing and displays the color fields. For the time being, prepare an empty function.
What follows is a wait command with the parameter of 0. Why is it here? As you know, the wait command ensures that the window is displayed. When the program starts, the window is not turned on right away. The program waits for the first wait command. When it comes, the program assumes that the window content is already prepared. Without this behavior, transitory effects could be seen during the program startup. The wait command with the parameter of 0 ensures that the window is turned on immediately after startup. Without it, the window would be turned on a little while later, after all files would have been found. This is not a mistake, but if the window does not appear soon enough, the user may doubt whether the program is starting at all and try to run it again.
The load picture list function finds all BMP files with pictures. The load picture function loads the current picture into the program and displays it. So far, only prepare empty functions. The last four commands redefine the cursor appearance. We will talk about them later.
If you run the program now, you see a white sheet, two buttons in the bottom right corner, and texts in the window title and the status bar. It is nothing special, but it is just the beginning.
In the Global Variables and Functions window, create a new list called color list. Set the size of the list to 36. This will be the number of colors used in the editor. Rename the pointer in the list to color index and the automatic increment to color index increment. Add one numeric data element called color into the list.

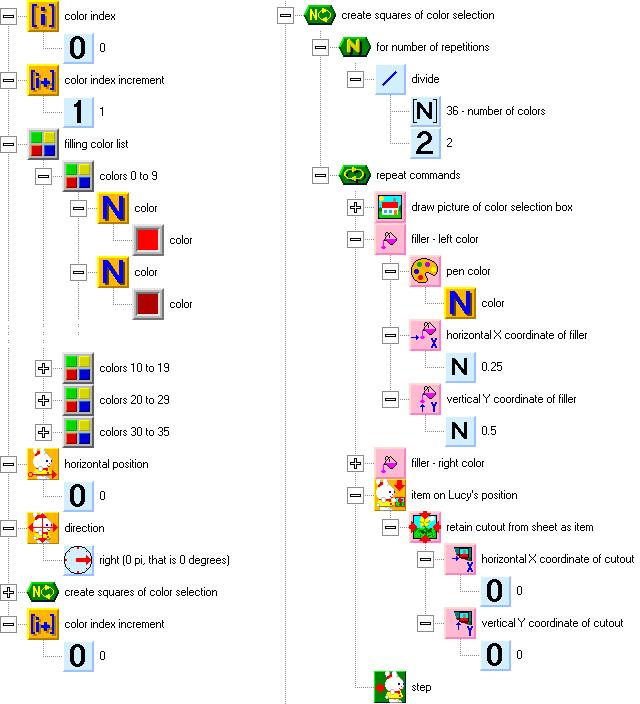
We will create the contents of the prepare service of color selection function. Switch into it by double-clicking its icon. The whole function is shown on the following picture. On the right side, there is the cycle that creates the color fields.
First, we will fill the list of colors. Set the color index to 0 and the color index increment to 1. This ensures that the colors will be stored in the list from the beginning and that the pointer will automatically be increased by 1 when each color is set. The color setting commands follow. Choose 36 colors (not black — that will be used for picture outlines). Why 36? For the choice of color, we will have 18 squares, and each square will contain 2 colors.
The color choice fields will be displayed using items. Items are more suitable than graphical rendering here, because when we would fill areas, the color could also get into the color fields. Instead of drawing items by hand, we will create them programmatically. It is easier than editing 36 fields and it will be easier to keep matches between the fields and the actual colors, should we change the colors in the program later.
In the Global Variables and Functions window, create a picture (not an item) called color selection box with the size of 1x1 square. Into it, draw fields for the choice of two colors, like this:

To create items, we will render the picture into the program window, fill it with colors, cut it out of the window as an item, and lay it on the sheet. We will use Lucy to lay the items on the sheet. We will set her to the first field (with the horizontal coordinate of 0) and turn her to the right. A cycle for all color items (half of the number of colors) follows.
The first command in the cycle will draw the picture of the color selection box. It will have just one parameter — the picture to be drawn. If the rest of the parameters are skipped, the picture will be drawn in the bottom left corner of the window.
The second command will fill the left field with a color from the list. The coordinate will refer to the center of the field. In a similar way, we will fill the second field with the second color. Remember that the color index moves automatically.
Cut the created picture from the window by
using the
retain cutout from sheet as item ![]() function, and lay it onto Lucy's position. Lucy will then go to
the next square.
function, and lay it onto Lucy's position. Lucy will then go to
the next square.
When all color fields are created, change the color index increment to 0. From now on, we won't use automatic increments in the program.
Do you think that we perform too many operations in the window and that they must be visible? These preparatory drawing operations are actually very fast and we have time enough before the contents of the window will be rendered on the screen with the first wait command. The picture we drew will remain hidden under the first color selection item, and so we don't even have to clear it.
You can run the program now. If everything is OK, a bar with the color selection fields will appear in the bottom of the window.
In the Global Variables and Functions window, prepare a list that will keep the names of all files that will be found (like on the following picture). Label it picture names list.
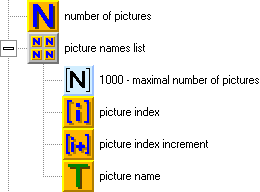
Set the list size to 1000. It may be a relatively huge redundancy, but it is not very important from the point of view of memory consumption. Generally, each variable in a list takes up 4 bytes; only numeric variables take up 8 bytes and logical variables 1 byte. Our list will use 4000 bytes. We can count on millions of bytes of free memory.
Call the list pointer picture index and rename the automatic pointer increment to picture index increment. Add a new textual variable called picture name into the list.
Besides the picture list, we will also create a numeric variable called number of pictures. We will probably not fill the whole list, and this variable will keep the actual number of the pictures in the list.
Now we will prepare the load picture list function. If you opened the Filler sample program, you can see a function that is a bit more difficult in it. The sample program supports multi-user environment, and so it loads files also from the program's home folder. We will use a simple variant, which will only load picture files from the current folder.
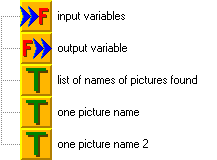
We will prepare the local variables of the function. The names of the files that will be found will be stored in a text variable called list of names of pictures found. We will sort the list alphabetically, and for this purpose, we will prepare another two textual variables — one picture name and one picture name 2.
The next picture shows the function contents. The function will load the names of picture files from the current folder, add the names to a list, and sort the list alphabetically.
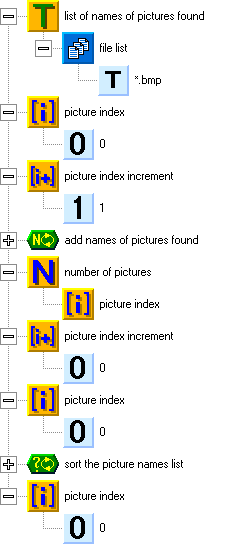
To find files in the folder, we will use
the file list ![]() function. As the function parameter, we will use a textual
specification of the files to find. The specification uses
wildcard characters (a question mark "?" represents any character, an asterisk "*" represents any group of characters). You can
specify more entries. The individual entries will be separated by
a semicolon ";". To find e.g. all BMP picture files, we will
type *.bmp; to find all BMP and JPG (another format supported
by Peter) files, we will specify these two entries: *.bmp;*.jpg.
function. As the function parameter, we will use a textual
specification of the files to find. The specification uses
wildcard characters (a question mark "?" represents any character, an asterisk "*" represents any group of characters). You can
specify more entries. The individual entries will be separated by
a semicolon ";". To find e.g. all BMP picture files, we will
type *.bmp; to find all BMP and JPG (another format supported
by Peter) files, we will specify these two entries: *.bmp;*.jpg.
The file list function returns a multi-line text, in which each line contains the name of one file found, including its extension (but not its path). When searching for BMP files, we could get for example this text:
| Bull.bmp Car.bmp House.bmp Kite.bmp Ram.bmp |
We will add the names of the individual files into the picture names list. Initially, we will set the picture index to 0 and the picture index increment to 1 (we will use automatic increments of the index of the list). As the line number, we can use the picture index. The index will be automatically increased after the name is saved.
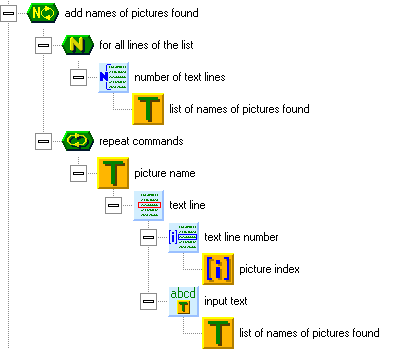
After saving all file names into the list, we will use the final state of the picture index to set the number of pictures variable, and we will set the picture index increment to zero.
After this, we will sort the list of picture names alphabetically. We will go from the beginning of the list to the end, and each time, we will compare two neighboring names. If we find an unsorted pair, we will replace the positions of the names and go back to the previous pair to ensure that the alphabetically first name will be moved as far to the beginning of the list as appropriate.
The sorting will be performed in a conditional cycle. In the cycle condition, we will test if there is still another pair of names. In the beginning of the cycle, we will store the first name into a textual variable called one picture name. We will increase the pointer to the following name in the list, and test if the first name is alphabetically further (higher) than the second name. If it is, we will switch the names' positions.
When replacing the names, we will store the second name (to which the pointer is set now) into the one picture name 2 variable. We will save the first name into the second name's position. We will decrease the pointer back to the first name, and save the name that used to be second into the first name's position. The positions are switched now.
Finally, we will decrease the pointer in the list to be able to move the first name towards the beginning of the list (if it is not in the appropriate position yet).
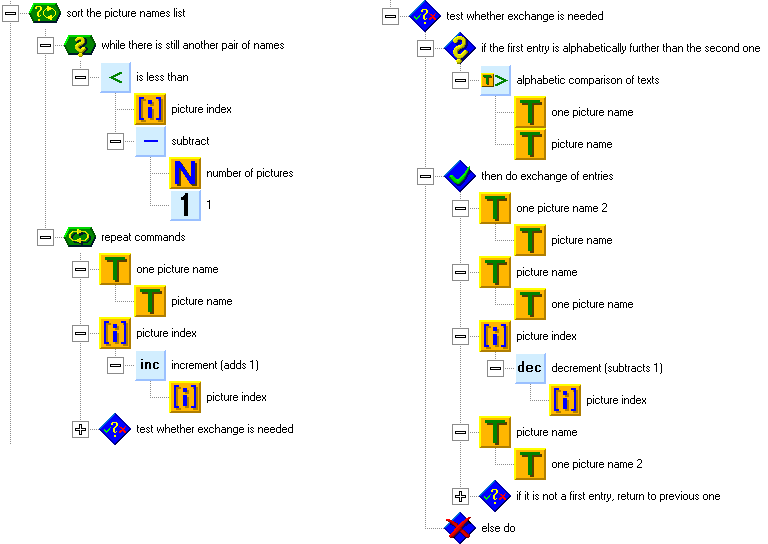
Look at the sorting method and make sure that you understand how it works. It is not the fastest method, but it is simple and good enough.
The last command in the load picture list function sets the picture list pointer to the value of 0. That will be the default picture to display.
We will create the contents of the load picture function. It is quite simple, as you see bellow. We
need a couple of elements for working with files from the files ![]() group. First, we will set the active file/folder for reading
group. First, we will set the active file/folder for reading ![]() accordingly to the picture name from the list. Then, we will put
the picture
accordingly to the picture name from the list. Then, we will put
the picture ![]() element (data
element (data ![]() subgroup) in the draw picture command. That's it.
subgroup) in the draw picture command. That's it.
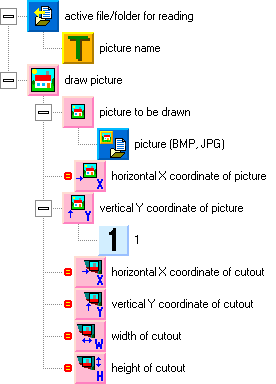
You may wonder what will happen if no picture file is found. In that case, the picture name will contain an empty text, and the functions for loading or saving a picture will not be performed. In the sample program, this is supplemented by displaying a text, which informs the user that no picture was found.
Now, we should prepare a few pictures, or at least one picture. We can use Peter's graphical editor for this. Set the picture size to 20x15 steps (i.e. 640x480 points). Draw the outlines with black color. Make sure that the outlines contain closed-up areas. Otherwise, the color will leak. After the picture is drawn, save it in the Library of Variables and Functions and use Windows Explorer to move it (typically from the C:\My Documents\Peter\Picture folder) into the folder containing the Filler program. You can also use Peter's sample pictures in the [examples]\Drawing group.
When you have at least one picture in the same folder as the Filler program, you can test the program. The alphabetically first picture should appear.
In the program, we will use Peter as the
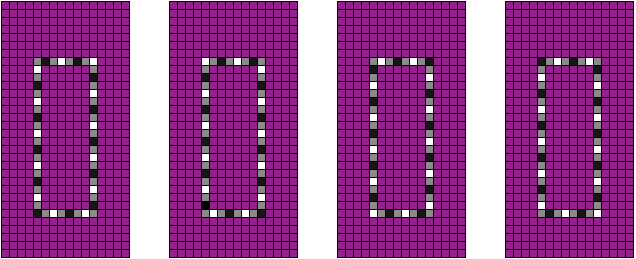
indicator of the selected color. Double-click the Peter icon in the Global Variables and Functions to edit the sprite. Change the sprite parameters
(by clicking the Properties ![]() button) to the following values: Delay Between Phases = 110, Phases per Step = 0,
Standstill Phases =
4, Moving Phases = 0, Directions = 1,
Picture Width = 0.5. Delete the pictures of Peter from the sprite and
double-click the first picture to edit it. Draw a frame into the
picture using a white-gray-black-gray color sequence. Copy the
picture to the remaining fields of the sprite. Each time, move
the points by 1 point clockwise. When you test the sprite, you
will see the frame "flowing" around the border.
button) to the following values: Delay Between Phases = 110, Phases per Step = 0,
Standstill Phases =
4, Moving Phases = 0, Directions = 1,
Picture Width = 0.5. Delete the pictures of Peter from the sprite and
double-click the first picture to edit it. Draw a frame into the
picture using a white-gray-black-gray color sequence. Copy the
picture to the remaining fields of the sprite. Each time, move
the points by 1 point clockwise. When you test the sprite, you
will see the frame "flowing" around the border.
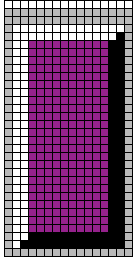
Lucy will be used to indicate the color under the mouse pointer. Start editing the sprite of Lucy and set the following parameters: Phases per Step = 0, Moving Phases = 0, Directions = 1, Picture Width = 0.5. Redraw the picture in the sprite to create an impression of an elevated color picker field. Leave the central part transparent.
In the main program loop (before the wait command), prepare a group called detect and test validity of the color under cursor. Here, we will continually test the color under the mouse pointer, which will enable us to indicate the appropriate color. The detected color will also be used in other structures in the program as well.
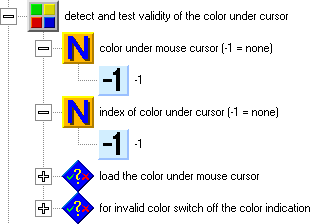
In the Global Variables window, prepare two numeric variables: color under mouse cursor and index
of color under cursor. In the
beginning of the group, set both of these variables to -1, to indicate there is no valid color under the
pointer. What follows is a conditional command that tests if the
mouse pointer is above the picture. The test will begin with a mouse test in the region ![]() element (controls
element (controls ![]() group, mouse
group, mouse ![]() subgroup), with parameters set accordingly to the picture in the
window. If the pointer is above the picture, we will get the
color under it by using the get color of pixel
subgroup), with parameters set accordingly to the picture in the
window. If the pointer is above the picture, we will get the
color under it by using the get color of pixel ![]() function (graphic
function (graphic ![]() group). We will store the color in the color under mouse cursor variable. The coordinates of the point from which
to get the color will be the same as those of the mouse: mouse position in horizontal
direction
group). We will store the color in the color under mouse cursor variable. The coordinates of the point from which
to get the color will be the same as those of the mouse: mouse position in horizontal
direction ![]() and mouse position in vertical
direction
and mouse position in vertical
direction ![]() . In Peter's programs,
information about the mouse (and other devices) doesn't change
until the next wait command.
. In Peter's programs,
information about the mouse (and other devices) doesn't change
until the next wait command.
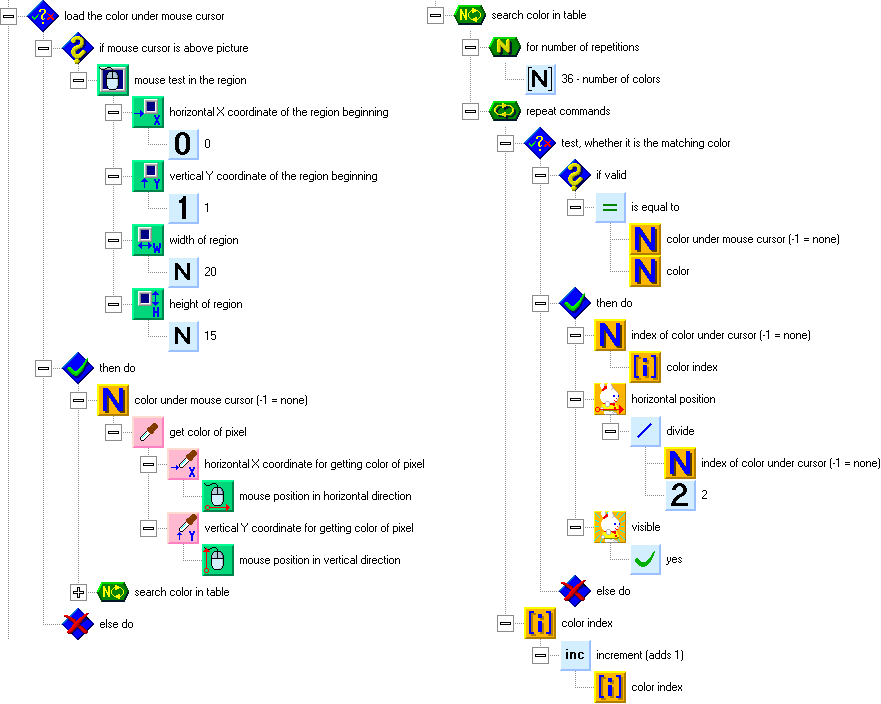
After reading from the point, we will try to find the color in the color table. The cycle for this is on the picture on the right. The cycle goes through the whole color table, comparing each color with the one under the pointer. If it finds the matching color, it stores its index into the index of color under cursor variable, sets Lucy (as the indicator of the color under the pointer) over the field of that color, and switches Lucy's visibility on.
Look closely at the cycle we have used. The color index in the color list identifies the color selected by the user. The cycle goes through the whole color list, and after the cycle is finished, the color index will have exactly the same value as before the cycle began. We have used an automatic return of the pointer to the beginning of the list after the end is reached.
Let us look at Lucy. Throughout the program, her vertical coordinate keeps the default value of 0. Her horizontal coordinate is set to the half of the index of the color under the pointer, as the color fields are half a square wide. If you wonder whether Lucy can also stand between squares, then the answer is yes. When we set the coordinates of Lucy, we can use any value, including values outside the window, as Lucy is a normal sprite. Only when being moved by a step command, Lucy is limited to the window sheet, and her target coordinate is truncated to the nearest square. The same applies to Peter.
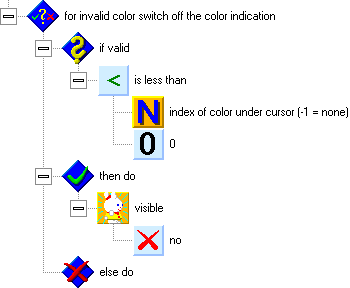
Behind the conditional command that gets the color, there is a conditional command that switches the color indicator off when there is no valid color under the pointer. This can happen if the pointer is not above the picture, or if there is black (or unknown) color under it.
Run and test the program. The indication of the color under the pointer should work now. If you rest the mouse pointer over a color in the picture, the field with the appropriate color should be elevated over the window surface.
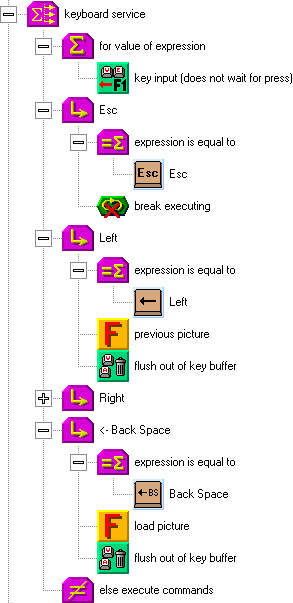
We will start working on the program
control. We will begin with keyboard control. After the structure
that detects the color, insert a multibranch control structure ![]() called keyboard
service. As the tested value,
use the key
input (does not wait for press)
called keyboard
service. As the tested value,
use the key
input (does not wait for press)
![]() function.
function.
The first branch of the structure will
handle the Esc ![]() key. Here, the break
executing
key. Here, the break
executing ![]() command will be used,
which will quit the main program loop.
command will be used,
which will quit the main program loop.
The second branch will take care of the Left ![]() key. Create an empty function called previous picture and insert
it in the branch. Behind it, put a flush out of key buffer
key. Create an empty function called previous picture and insert
it in the branch. Behind it, put a flush out of key buffer ![]() command. The loading of a picture takes a while. If the user
holds the key, the key codes are coming too fast for the program
to switch pictures. For this reason, the program would move
through pictures even after the key would be released. The
control would be subject to inertia, which is not pleasant.
command. The loading of a picture takes a while. If the user
holds the key, the key codes are coming too fast for the program
to switch pictures. For this reason, the program would move
through pictures even after the key would be released. The
control would be subject to inertia, which is not pleasant.
The branch for the Right ![]() key
will be similar, only this time, we will use a next picture function. You can also add branches for other
direction keys, e.g. Home to jump to the first picture, End to jump to the last picture, and Ctrl+Left/Right to
move 10 pictures in the desired direction.
key
will be similar, only this time, we will use a next picture function. You can also add branches for other
direction keys, e.g. Home to jump to the first picture, End to jump to the last picture, and Ctrl+Left/Right to
move 10 pictures in the desired direction.
The last key will be Back Space ![]() .
The user can use it to reset the picture to the original state
(as it was before editing). This will be handled by the load picture function, which will read the picture from the file
anew. After this, another flush out of key buffer command
follows.
.
The user can use it to reset the picture to the original state
(as it was before editing). This will be handled by the load picture function, which will read the picture from the file
anew. After this, another flush out of key buffer command
follows.
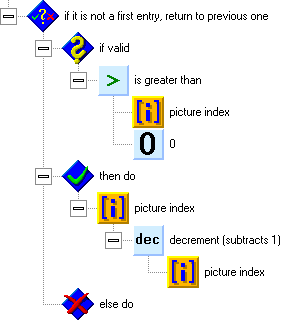
The pictures below show the contents of the previous picture (on the left) and next picture (right) functions. In the beginning of the functions, the current picture is saved (if it has been changed). So far, you may just create an empty save picture function.
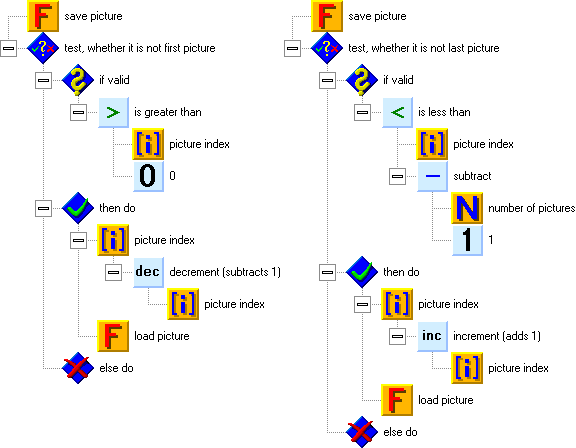
In the previous picture function, we will check if we're not working with the first picture. If we're not, we can move the picture pointer to the previous picture, and load and display the new picture. If we work with the first picture, nothing will be performed, but we could set the pointer to the last picture (which is number of pictures - 1) and move around the pictures in circles.
In the next picture function, we will check if we don't have the last picture in a similar way. The number for the last picture is the number of pictures decreased by 1. If we don't have the last picture, we will increase the pointer to the next picture and load the new picture. In the case of the last picture, we could move to the first picture to ensure cyclic browsing.
Test the program. You can move among the pictures by using the Left/Right keys, or press Esc to quit the program.
We will not create the function for saving the picture so far. Otherwise, we could overwrite a picture by an accident. First, we will create the structure for mouse control. In the main program loop, insert a conditional command called click by left mouse button behind the structure for keyboard service.
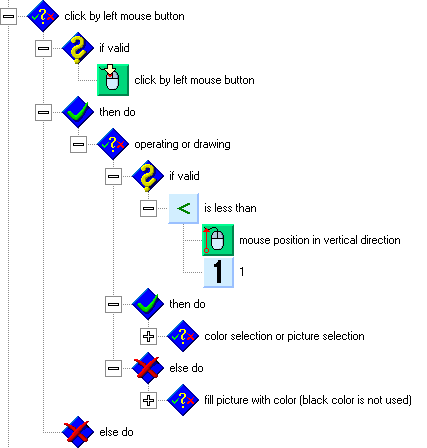
Insert a click by left mouse button ![]() flag into the condition test. It is a logical flag, and it is set
each time that the user left-clicks in the program window. The
flag is turned off when it has been read, e.g. by being used in a
condition. If you want to test the left-click flag more times,
store it into a logic variable
flag into the condition test. It is a logical flag, and it is set
each time that the user left-clicks in the program window. The
flag is turned off when it has been read, e.g. by being used in a
condition. If you want to test the left-click flag more times,
store it into a logic variable ![]() .
.
If the condition test detects that the user has clicked the left mouse button, we will use another conditional command to distinguish (by the vertical coordinate of the mouse) whether the user has clicked into the picture or into the bar with colors and buttons. The border point here is the value of 1, as the bar is 1 square high.
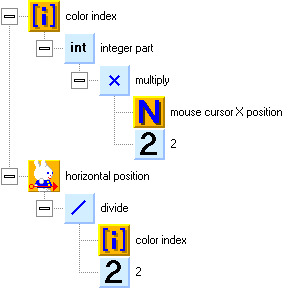
For the choice of color, we will create a new function called color selection. Into the input variables of the function, we will insert a mouse cursor X position numeric variable. It will pass the horizontal coordinate of the mouse in the color selection bar to the function.

In the function, we will take the value of the input variable, multiply it by 2 to convert the coordinate to the number of a color, use the integer part function to delete the unnecessary decimal part, and use the result to set a new color index. We will set the horizontal coordinate of Peter to the half of the color index value, which corresponds to the position of the color field. Peter is used in the program as the indicator of the selected color. His vertical coordinate remains set to 0 permanently, and so we don't have to pay attention to it.
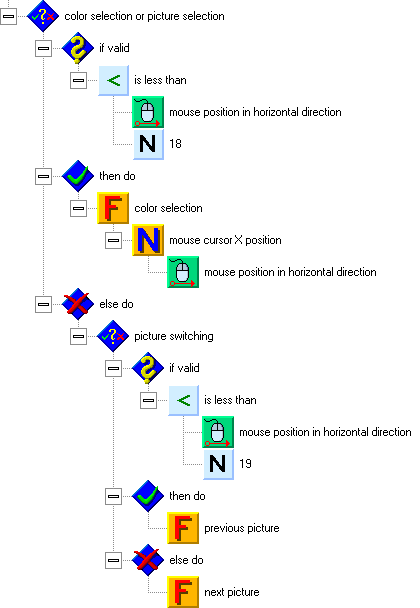
If the vertical coordinate of the mouse tells us that the user has clicked into the bar with buttons and colors, we will use the horizontal coordinate to distinguish, if they have clicked into a color field or on a button. If the horizontal coordinate is less than 18, then the user selects a color. We will invoke the color selection function and use the coordinate as its parameter. In other cases, the user has clicked a button to move among pictures. A horizontal coordinate below 19 indicates the left button, and so we will invoke the previous picture function. In the remaining cases, we will invoke the next picture function. The whole structure for the color choice fields and direction buttons is on the following picture.
You can test the program. You can use the left mouse button to switch pictures, or to change the selected color in the color selection bar.
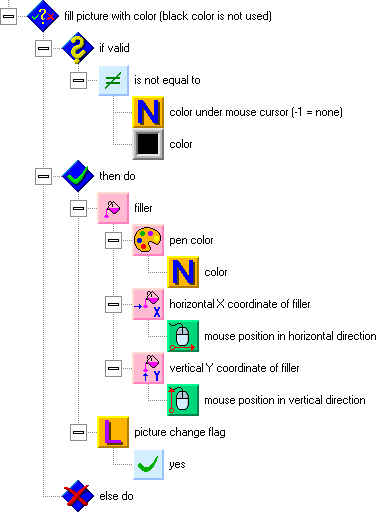
Now we will handle the cases when the user left-clicks into the picture. The structure will be based on a fill picture with color conditional command (see next picture). The condition test will check if there is black color under the mouse pointer. Black is used for outlines, and cannot be used for filling. The color under the pointer has been saved to a variable in the beginning of the program main loop.
Then we can fill the picture with a Filler ![]() command. The color is set by the color variable
from the color list. The coordinates for the filling will be
those of the mouse. Finally, we will set a picture change flag, which we will prepare in the Global Variables and
Functions windows. The flag
indicates that the picture can be saved.
command. The color is set by the color variable
from the color list. The coordinates for the filling will be
those of the mouse. Finally, we will set a picture change flag, which we will prepare in the Global Variables and
Functions windows. The flag
indicates that the picture can be saved.
Run the program, try to fill the picture with a selected color, and verify that you cannot fill the picture with black color.
The structure for the right mouse button
will be similar, and so we can copy the whole structure for the
left button. In the condition test, we will replace the element
that tests the left button ![]() with an element for the right button
with an element for the right button ![]() . The structure for
buttons and color selection remains unchanged. The filling
structure will be deleted and replaced by a pick color under mouse
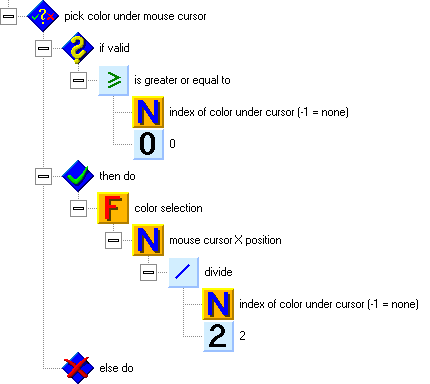
cursor structure. Here, we
will test the
index of color under cursor
variable to check if there is a valid color under the pointer (to
make sure that it is not black or a non-standard color). If the
pointer is above a valid color, we will set it as the new
selected color, recalculating the color to the X coordinate.
. The structure for
buttons and color selection remains unchanged. The filling
structure will be deleted and replaced by a pick color under mouse
cursor structure. Here, we
will test the
index of color under cursor
variable to check if there is a valid color under the pointer (to
make sure that it is not black or a non-standard color). If the
pointer is above a valid color, we will set it as the new
selected color, recalculating the color to the X coordinate.
Run the program and test if you can control the choice of colors and pictures with the right mouse button in the same way as with the left one. By right-clicking into the picture, you can pick the color under the pointer and set it as the selected color.
Finally, we can pay attention to the save picture function. Its contents are on the following
picture. First, we will test if the picture has been changed and
needs to be saved. If it does, we will use the picture name (from
the list of picture names) as the active file/folder for writing ![]() .
Then we will set size
of file
.
Then we will set size
of file ![]() to 0 to make sure that no old data can remain in the
file behind the picture. To save the picture, we will cut the
picture from the window with the retain cutout from sheet as picture
to 0 to make sure that no old data can remain in the
file behind the picture. To save the picture, we will cut the
picture from the window with the retain cutout from sheet as picture ![]() function, and then we will write the picture into a file by
passing it to a
picture
function, and then we will write the picture into a file by
passing it to a
picture ![]() element. Finally, we
will turn off the picture
change flag.
element. Finally, we
will turn off the picture
change flag.
By adding the save picture function behind the main program loop, we will ensure that the picture will be saved upon quitting the program with the Esc key. The program has all the functionality now and you can test it. Verify that the changes in the pictures are saved upon both switching to another picture and quitting the program with the Esc key.

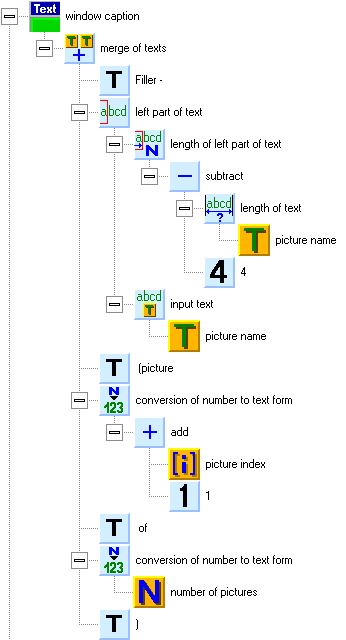
We can make further improvements to our program. For example, we can display the picture name, picture number and total number of pictures in the window title. We will put the structure for this into the beginning of the load picture function, as illustrated on the next picture. This will result in a text like e.g. this one: "Filler — House (picture 4 of 50)". You cannot see it on the picture, but don't forget about spaces in the appropriate places in the text (behind the dash in "Filler — " and on both sides of " (picture " and " of "). We will display the picture name without the extension, and so we truncate the last four characters (the period and the BMP extension).
Another improvement will redefine the pointer appearance. In the Global Variables and Functions window, prepare four items with pointer pictures — two arrows, a pipette and a filling.
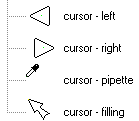
The pictures have black outlines, the surroundings are transparent, and the insides are white. On the tips of the pipette and the filling pointer, add a yellow dot as the positioning indicator (with color inversion). In the arrows, the positioning indicator stays in the center, which is the default setting.
In the program initialization group, we will use setting shape of mouse cursor ![]() commands to specify the appearance of the pointer in the
individual parts of the window. We will define the pipette for
the color choice fields, the arrows for the movement buttons, and
the filling pointer for the picture area.
commands to specify the appearance of the pointer in the
individual parts of the window. We will define the pipette for
the color choice fields, the arrows for the movement buttons, and
the filling pointer for the picture area.
To understand the function of the command that defines the pointer appearance, you can think of the areas for definitions of the appearance as of rectangles, which (when added) overwrite the old definitions. The topmost definitions are always in effect. If we don't specify any pointer picture, then the standard appearance of a mouse in a window will be used. If colored pointer is defined in Windows, then the program will use this colored pointer. If we don't specify an area, then the mouse pointer is defined for the whole window. All definitions can be cancelled by inserting this command without any parameters.
14. Mishmash Drawing <<< Contents >>> 16. Dialogs