13. Beginning with Graphics <<< Contents >>> 15. Fill Your Own Colors
If you don't like the word "mishmash" in the chapter title, you can replace it with anything else, but it is probably the best designation for what we are going to do.
First, we will try the basic graphical commands for drawing. Create a new program called Graphic or open the sample program.
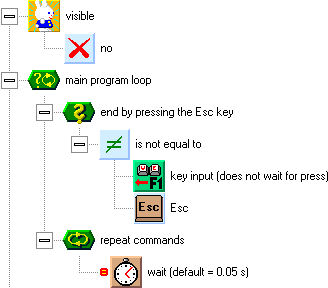
We won't need Peter in our program, and so
we will turn his visibility off by the visible ![]() command with the no
command with the no ![]() parameter in the beginning of our program. The program will be
based on a conditional
repeating of commands
parameter in the beginning of our program. The program will be
based on a conditional
repeating of commands ![]() cycle that can be
ended by pressing the Esc
cycle that can be
ended by pressing the Esc ![]() key. Put this command behind the one that turns Peter's
visibility off, and add a wait command into it.
key. Put this command behind the one that turns Peter's
visibility off, and add a wait command into it.
Another very important task is making the
squares in the item layer transparent. Edit the empty square ![]() item. In the color picker, choose the top left color (purple). It
is a transparent
color, which will enable us to
see through the square with an item. Choose filled box
item. In the color picker, choose the top left color (purple). It
is a transparent
color, which will enable us to
see through the square with an item. Choose filled box ![]() as
the drawing tool, and redraw the whole item with the transparent
color.
as
the drawing tool, and redraw the whole item with the transparent
color.
If you will run the program now, you won't see anything but a black sheet. You see the graphic layer, which will be the basis for our next programs. Later, we will use both items and graphics together. After you try the first graphical command, you can draw something into the empty square item. You will see the graphic and a net of empty square pictures over it.
In the Basic Elements group, find the graphic ![]() group, drawing
group, drawing ![]() subgroup. It contains commands for drawing graphical elements.
Drag the point
subgroup. It contains commands for drawing graphical elements.
Drag the point ![]() command into the main program loop. It contains another four
elements that specify the parameters of the point rendered.
command into the main program loop. It contains another four
elements that specify the parameters of the point rendered.
The first parameter, pen color ![]() ,
specifies the color of the point. Color is a number, which can be
kept in a numeric variable. We are not interested in its value so
far, as we can use special functions to specify color. In a new
command, the pen
color
,
specifies the color of the point. Color is a number, which can be
kept in a numeric variable. We are not interested in its value so
far, as we can use special functions to specify color. In a new
command, the pen
color ![]() element contains a color
element contains a color ![]() element. This is a color
constant, which passes the
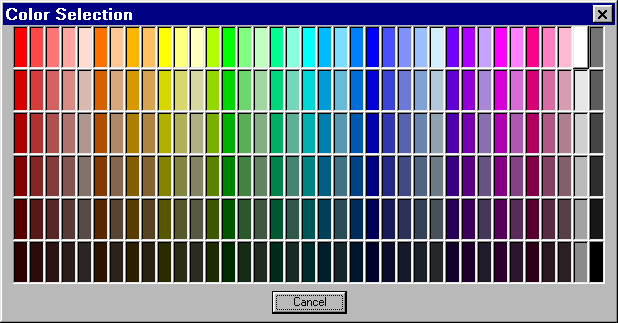
selected color to the command. You can select a new color by
double-clicking the color constant element. The color selection
window appears. The selected color is indicated by the elevation
of its field. Clicking selects a different color. The color will
also appear in the color constant element.
element. This is a color
constant, which passes the
selected color to the command. You can select a new color by
double-clicking the color constant element. The color selection
window appears. The selected color is indicated by the elevation
of its field. Clicking selects a different color. The color will
also appear in the color constant element.
In our program, we will render points with
a random color. For this reason, we will discard the color
constant element, and use the compound color components to color ![]() element (from the graphic
element (from the graphic ![]() group) instead of it. This component contains another three
elements, red
component (0 to 1)
group) instead of it. This component contains another three
elements, red
component (0 to 1) ![]() , green component (0 to 1)
, green component (0 to 1) ![]() and
blue component
(0 to 1)
and
blue component
(0 to 1) ![]() . The components
specify the level of individual colors in the resulting color.
The closer is the value to 1, the brighter the component is. For
example, yellow has the values of 1/1/0. A random color can be
created by inserting random
number (0 <= x < 1)
. The components
specify the level of individual colors in the resulting color.
The closer is the value to 1, the brighter the component is. For
example, yellow has the values of 1/1/0. A random color can be
created by inserting random
number (0 <= x < 1) ![]() components into the
color components (the range for a random number is 0 to 1 as
well).
components into the
color components (the range for a random number is 0 to 1 as
well).
Another parameter for the point command is
the pen width ![]() element. It is a numeric value, which specifies how many
graphical points wide will the point be. The point size will be
generated randomly, and so we will insert a random number with
the parameter of 9 here, which will create random points with the size
of 1 to 9 graphical points (we don't have to care about zero, the
point command modifies it to 1).
element. It is a numeric value, which specifies how many
graphical points wide will the point be. The point size will be
generated randomly, and so we will insert a random number with
the parameter of 9 here, which will create random points with the size
of 1 to 9 graphical points (we don't have to care about zero, the
point command modifies it to 1).
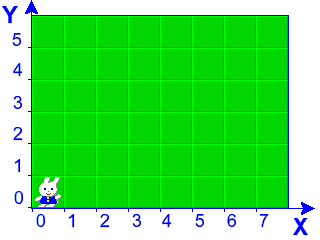
The last two elements of the command, horizontal X coordinate of
point ![]() and vertical Y coordinate of point
and vertical Y coordinate of point ![]() ,
specify the position, where the point will appear. The previous
picture shows how graphical coordinates are numbered. It is the
same as the numbering of squares, as we know it from previous
chapters. The basic unit of Peter's coordinates is a unitary step. The length of the step is the same as a square
width. The beginning of the coordinates is in the bottom left
corner. As the coordinates are expressed by decimal numbers, we
can specify the coordinates for squares, graphics and sprites in
the same way, without any conversions.
,
specify the position, where the point will appear. The previous
picture shows how graphical coordinates are numbered. It is the
same as the numbering of squares, as we know it from previous
chapters. The basic unit of Peter's coordinates is a unitary step. The length of the step is the same as a square
width. The beginning of the coordinates is in the bottom left
corner. As the coordinates are expressed by decimal numbers, we
can specify the coordinates for squares, graphics and sprites in
the same way, without any conversions.
The coordinates for the point will be
specified randomly, as we know it from previous chapters, by
using random numbers ![]() with the parameters of the width
with the parameters of the width ![]() and height
and height ![]() of the sheet. The
resulting command for the random point will look like this:
of the sheet. The
resulting command for the random point will look like this:
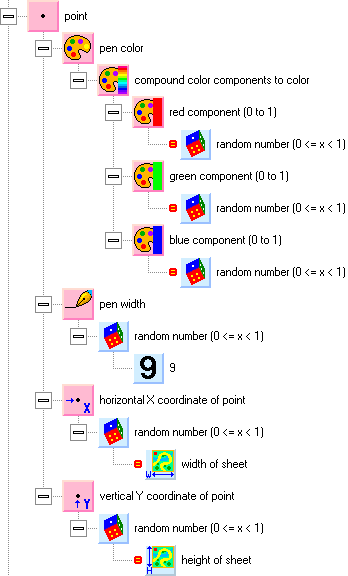
Run the program. Color points of different sizes start appearing on the sheet. The rendering is not very quick. After each point in the loop, the program waits a little moment (55 ms), which means that the speed of rendering is 18 points per second.
This is a good time for discussing the
program timing. As we already said, the wait ![]() command has, besides the waiting function, also a function for
cooperation with other programs (and with the core of Windows).
An advanced user can use the System Monitor program to verify that the Graphic program is a minimum load for the computer, and
that the program speed is independent of the computer speed. To
be accurate — the wait command does not represent an actual
pause of a given length; it represents synchronization with the
inner clock of the computer. For this reason, the program speed
does not depend on the speed at which the commands between two
wait commands are executed.
command has, besides the waiting function, also a function for
cooperation with other programs (and with the core of Windows).
An advanced user can use the System Monitor program to verify that the Graphic program is a minimum load for the computer, and
that the program speed is independent of the computer speed. To
be accurate — the wait command does not represent an actual
pause of a given length; it represents synchronization with the
inner clock of the computer. For this reason, the program speed
does not depend on the speed at which the commands between two
wait commands are executed.
Try to fill a value of 0 into the wait command. The program will now produce very many points. It does not wait for the interval now; it runs at maximum speed. Yet, it ensures that the window sheet is rendered on the display at each pass through the loop. This is another function of the wait command — it ensures rendering. The program does not know when all graphical operations are finished, and so when it is a good time to render the window on the display. If the program rendered the window itself, the background of a game could appear, but not the characters in it. As a result, the background would show through the characters. For this reason, rendering is performed during the waiting, when all graphical operations are probably finished.
A tip for program optimization: The program redraws a rectangular part of the window, where changes were made. If you want to increase the program speed, render only the changed area of the graphic. On the other hand, this could lead to rendering many small parts of the graphic, which could be more demanding than rendering the whole window at a time.
Timing with the value of 0 is useful in situations, when you need higher program performance, or when the timing after 0.055 seconds is too rough. It ensures fluent redrawing of the window, maximum program speed, and sufficient cooperation with Windows. The program speed is dependent on the computer speed now. We could use System Monitor to see that the program consumes most of the computer performance, even if it seems to be in a relatively quiet state.
You can also try to disable timing
completely by using the Turn
Off ![]() button. If you run the program now, you
see a noise of colors instead of points. Now, the program really
runs at maximum speed, without any pauses. You may notice that
the color noise is not fluent; the image is a bit choppy. It is
so because the program ensures at least a minimum redrawing of
the window to the display. If there is no wait command for about
0.2 seconds, the program redraws the window itself.
button. If you run the program now, you
see a noise of colors instead of points. Now, the program really
runs at maximum speed, without any pauses. You may notice that
the color noise is not fluent; the image is a bit choppy. It is
so because the program ensures at least a minimum redrawing of
the window to the display. If there is no wait command for about
0.2 seconds, the program redraws the window itself.
Let us get back to graphical commands. Add
other graphical commands to the main program loop — line ![]() , box
, box ![]() , filled box
, filled box ![]() , circle
, circle ![]() , filled circle
, filled circle ![]() , sphere
, sphere ![]() , triangle
, triangle ![]() — and try to render them randomly. Use a random radius of 2 with circle, filled circle and sphere. Skip Filling
— and try to render them randomly. Use a random radius of 2 with circle, filled circle and sphere. Skip Filling ![]() , as
it would not have much effect here.
, as
it would not have much effect here.
The text display ![]() command is also interesting. It has more parameters than you may
be used to, but don't worry. You don't have to set the parameters
that don't interest you. Their default values will be used then.
It is probably clear what the text to be displayed
command is also interesting. It has more parameters than you may
be used to, but don't worry. You don't have to set the parameters
that don't interest you. Their default values will be used then.
It is probably clear what the text to be displayed ![]() , pen color
, pen color ![]() , horizontal X coordinate of
text
, horizontal X coordinate of
text ![]() and vertical Y coordinate of text
and vertical Y coordinate of text ![]() parameters mean.
parameters mean.
A new element is the angle orientation of text ![]() . It
is the angle, at which the text is turned around the bottom left
corner. It is specified in radians, just like other angles in
Peter. We can use the direction constants that we know from
setting the directions of Peter and Lucy. If not specified, a
direction of 0 is used (horizontally from left to right).
. It
is the angle, at which the text is turned around the bottom left
corner. It is specified in radians, just like other angles in
Peter. We can use the direction constants that we know from
setting the directions of Peter and Lucy. If not specified, a
direction of 0 is used (horizontally from left to right).
The height of characters ![]() element specifies the height of the characters in the text. It is
specified in unitary steps. If not specified, the height of 0.5 will be used (half of the square height).
element specifies the height of the characters in the text. It is
specified in unitary steps. If not specified, the height of 0.5 will be used (half of the square height).
The relative width of characters (1 = usual) ![]() element represents a relative number indicating the width of the
characters when compared to the normal width. A value of 1 is the normal width. Numbers higher than 1 specify wider characters, smaller numbers specify
narrower characters. A special value is the number 0. This sets the recommended width for the type of
characters used. It is similar to the normal width, but may
differ slightly. If not specified, the default value of 0 is used (the recommended width).
element represents a relative number indicating the width of the
characters when compared to the normal width. A value of 1 is the normal width. Numbers higher than 1 specify wider characters, smaller numbers specify
narrower characters. A special value is the number 0. This sets the recommended width for the type of
characters used. It is similar to the normal width, but may
differ slightly. If not specified, the default value of 0 is used (the recommended width).
The bold ![]() , italic
, italic ![]() , underline
, underline ![]() and
strike out
and
strike out ![]() elements are logical switches that turn on special effects for
the text. By default, all of these are turned off. The serifs
elements are logical switches that turn on special effects for
the text. By default, all of these are turned off. The serifs ![]() switch turns on serif characters. By default, it is also turned
off. The typewriter
switch turns on serif characters. By default, it is also turned
off. The typewriter ![]() switch turns on characters with the same spacing and width. When
it is turned off, characters have different widths (I is narrower than M).
Unless specified otherwise, this switch is off as well.
switch turns on characters with the same spacing and width. When
it is turned off, characters have different widths (I is narrower than M).
Unless specified otherwise, this switch is off as well.
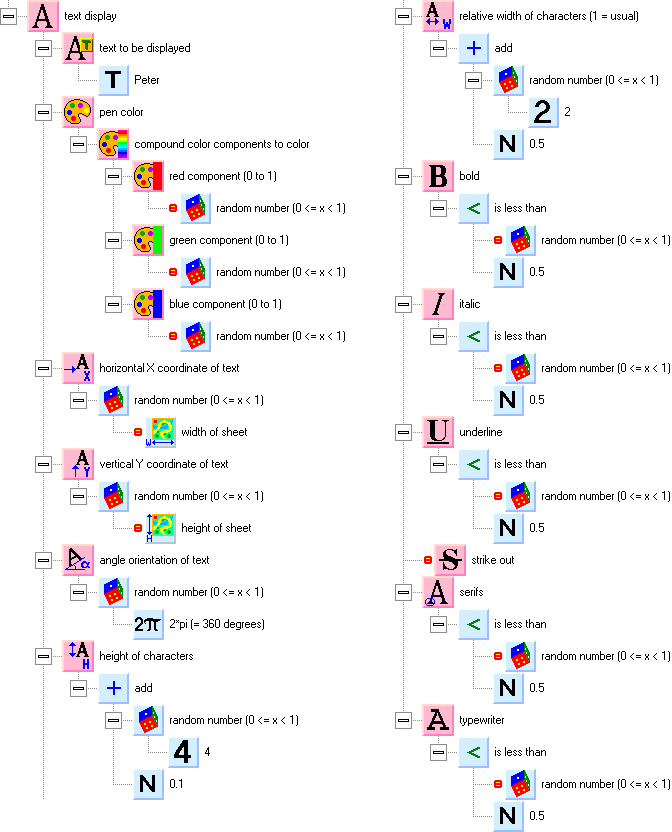
The whole command for a random text is on the previous picture. It is quite long, and so the picture is separated into two parts. Test the program after you create the command.
One of the most powerful aspects of graphics are pictures. You can use pictures for anything that is not predefined in Peter. You can create moving characters, a window with animated buttons, a moving background for a game, or snapshots.
The commands and functions for pictures are
in the graphic ![]() group, pictures
group, pictures ![]() subgroup. The basic command is draw picture
subgroup. The basic command is draw picture ![]() .
Besides obvious parameters, such as the picture to be rendered
and its coordinates, the command also has more parameters that
make it possible to draw only a specific part of the picture.
.
Besides obvious parameters, such as the picture to be rendered
and its coordinates, the command also has more parameters that
make it possible to draw only a specific part of the picture.
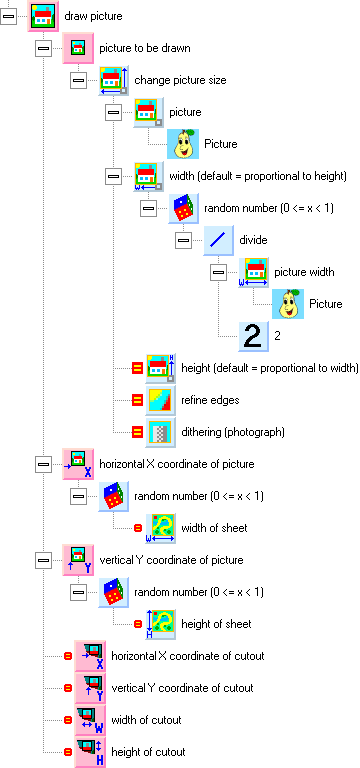
In our test program, we will try to render a picture randomly. Before you start drawing, you can look at the Library of Variables and Functions. With Peter, you also get many pictures. Open the [examples]\Drawing group. You will surely find a picture that you will like. When browsing, click to select the first picture in the group, and then scroll the selection cursor up and down by using the arrow keys. The editing window will show previews of the pictures.
Drag the selected picture into the Global Variables and
Functions window. If the
picture has a one-color background, you can fill the background
with the transparent color (by using the Filler ![]() function) to display the picture without any background.
function) to display the picture without any background.
The command for random drawing of the
picture is shown above. If you want to draw a picture with a
random size, you can use the change picture size ![]() function. The new picture width will be random, and will be based
on the original size shrunk to approximately one half. It is not
necessary to specify a new height; it will be adjusted to the new
width automatically.
function. The new picture width will be random, and will be based
on the original size shrunk to approximately one half. It is not
necessary to specify a new height; it will be adjusted to the new
width automatically.
Note: It is better to use a larger picture and a higher level of reduction. This ensures a higher quality of the resulting picture than using a smaller picture.
13. Beginning with Graphics <<< Contents >>> 15. Fill Your Own Colors