2. The Program Window <<< Contents >>> 4. First Steps
If you have played enough with the prepared programs, you surely wonder what it looks like inside Peter’s programs.
We will look at one program. For example, we will take the Train game. It is located in the Puzzles folder. Click the program icon. It will become enclosed in a frame and highlighted. The frame is called selection cursor, highlighting indicates a selected program.
Notice the bar with color icons in the
upper part of the window. This is a toolbar,
and it contains buttons for invoking actions quickly. The second
button from the left is called Open ![]() . This opens the program
and allows its contents to be edited. Click this button.
. This opens the program
and allows its contents to be edited. Click this button.

After you click the button, the program expands into many color icons. You have entered into the program editor. This opens up the great world of Peter the rabbit. If the icons seem unfamiliar to you, there is no need to worry. You will soon be working with them with the ease of a professional.
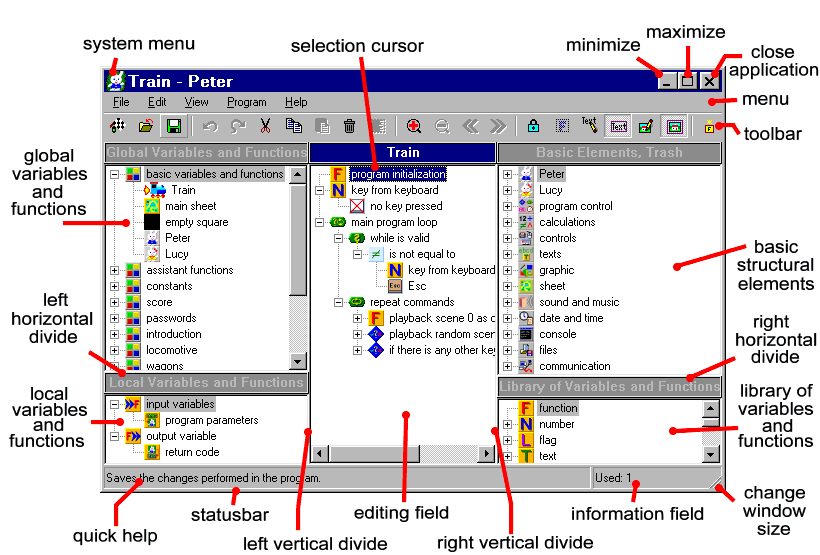
As you can see, the editor is divided into five parts — five windows. The middle window is the one that interests us most. On the picture, you see that it is labeled as editing field. This window is most important. It is used for assembling programs. The word "assembling" is used on purpose, as the programs are really assembled from predefined components. Each component — an icon — represents one command, one program element. All of the elements make up a working program, for example the Train game.

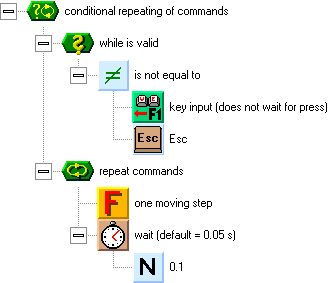
It is a distinguishing feature of Peter that the program elements, represented by the graphical icons, are put together using tree structures. The structures are like a tree with branches and leaves. Or do the colors and shapes of the icons look more like gems to you? (Why do we mention this? Guess what inspired the company name, Gemtree.)
One of the most useful features of the tree representation is the possibility to collapse its individual branches into icons. Only the part of the program that you are interested in can be left open. This feature of Peter’s editor enables a radical improvement in the programs readability.
Before we start to rearrange a program, we have to learn how to control the editor. To the left of several icons, you may notice gray squares with a "+" or "-" sign:
![]()
![]()
These squares tell us that the program element contains a branch with other elements. If you click a square with the "+" sign, the branch expands. If you click a square with the "-" sign, the branch collapses.
Look at the upper left window. Its title reads Global Variables and Functions. Each data element used in a program, e.g. a numeric variable containing a number, or a graphical variable containing a picture, must be created first in the Global Variables and Functions window (or in the Local Variables and Functions window, but this will be discussed later). The act of creating a data element is called declaration in programming languages, but as we work in a purely graphical environment, we do not have to pay much attention to such terms.
Each data element contains something during the creation of a program. A numeric variable contains a number, a graphical variable contains a picture, an item variable contains an item (which is basically a picture whose size is 32x32 points). You can view and change the contents of the data elements by double-clicking their icons. The contents of the elements appear in the editing window, and the menu and the toolbar change accordingly to the type of the element.
When viewing the contents of the elements,
you will come across two special types of them. The first one
contains commands, and it is referred to as a function ![]() .
Function is not a data element, and so its contents cannot be
changed or passed during the program’s run-time. It is used
in the program as a regular command. The second element, group
.
Function is not a data element, and so its contents cannot be
changed or passed during the program’s run-time. It is used
in the program as a regular command. The second element, group ![]() ,
does not contain anything, and is used only for grouping elements
for the sake of the program’s readability.
,
does not contain anything, and is used only for grouping elements
for the sake of the program’s readability.
Notice the Zoom In ![]() and Zoom Out
and Zoom Out ![]() buttons on the toolbar. These change the size of the active
(selected) window view. They are used most commonly in the
graphical editor for increasing or decreasing the size of
pictures. They are also used in windows with tree structures, for
example the Global
Variables and Functions
window. Select the window by clicking it. The selected window is
indicated by highlighting its title bar (usually dark blue
color). Then you can use these button to switch the view of the
icons in the window to half and normal size.
buttons on the toolbar. These change the size of the active
(selected) window view. They are used most commonly in the
graphical editor for increasing or decreasing the size of
pictures. They are also used in windows with tree structures, for
example the Global
Variables and Functions
window. Select the window by clicking it. The selected window is
indicated by highlighting its title bar (usually dark blue
color). Then you can use these button to switch the view of the
icons in the window to half and normal size.
If you still want to play with the sample
programs, you can modify the pictures in them. The modified
program starts when you click the Start ![]() button (the first button
from the left on the toolbar). If you want to take the changes
back, click the Undo
button (the first button
from the left on the toolbar). If you want to take the changes
back, click the Undo ![]() button
(fourth from the left). You don’t have to be afraid of
damaging the sample programs. If needed, you can simply delete
the program. Only the modified version will be deleted, and the
original sample program appears in its place again. When you
finish modifying the sample programs, close the program editor by
clicking the Close
button
(fourth from the left). You don’t have to be afraid of
damaging the sample programs. If needed, you can simply delete
the program. Only the modified version will be deleted, and the
original sample program appears in its place again. When you
finish modifying the sample programs, close the program editor by
clicking the Close ![]() button
(the second button from the left), and you may finally start
creating.
button
(the second button from the left), and you may finally start
creating.
A useful tip: If you want to learn something about an element, select it by clicking its icon, and press the F1 key. This displays a comprehensive help for that element.
One more tip: Sometimes when you save or start a program, the editor may display an error message stating that the program is probably running. A running program is the most common cause of problems. If you don’t quit a program and switch into Peter’s editor, e.g. by clicking on Peter’s window, the program hides under this window. It is not possible to save changes to a running program. You must close the program first. For this reason, you should always close the program first, and only then start modifying it.