9. Peter in a Maze <<< Contents >>> 11. Plenty of Monsters
Let us stay with the Way program from the last chapter. We will edit it, so that we can control Peter in the maze with our keyboard. We will try several methods of control, and we will keep all of them in the program for the sake of comparisons. We will also keep the method, in which Peter searches for his way himself.
From the program control ![]() group, drag the group
group, drag the group ![]() element into the main program cycle. Move all of the elements
that are in the main cycle now (the element for turning right,
the cycle for finding a free square, and the step command) into
this group. Collapse the group and add a note to it saying Peter Walks Himself. This hides the automatic search method, so that it
will not be mixed with other methods that we will create. Try to
run the program for testing purposes. It should run just as
before the modification.
element into the main program cycle. Move all of the elements
that are in the main cycle now (the element for turning right,
the cycle for finding a free square, and the step command) into
this group. Collapse the group and add a note to it saying Peter Walks Himself. This hides the automatic search method, so that it
will not be mixed with other methods that we will create. Try to
run the program for testing purposes. It should run just as
before the modification.
Click the new group icon to select it. On
the toolbar, click the Turn
Off ![]() button. The group and all of the elements
in it become gray. This function enables you to turn off parts of
a program when you don’t need them. When you run the
program, you see that Peter stands in the bottom left corner and
nothing happens. The program behaves as if the group and its
commands were not in it at all.
button. The group and all of the elements
in it become gray. This function enables you to turn off parts of
a program when you don’t need them. When you run the
program, you see that Peter stands in the bottom left corner and
nothing happens. The program behaves as if the group and its
commands were not in it at all.
We will assemble a new part of our program
inside the main program cycle, right after the previous group. We
will use a new element — multibranch control structure ![]() (sometimes also called "rake" among programmers). It is
in the program
control
(sometimes also called "rake" among programmers). It is
in the program
control ![]() group. Drag it into
the main cycle under the Peter Walks Himself group.
group. Drag it into
the main cycle under the Peter Walks Himself group.
The multibranch element branches programs into several parts, depending on a variable or expression value. Usually, branching is based on numeric values. Later we will also use it for other types of data, such as texts.
This element contains another four
elements. The first element, for value of expression ![]() ,
contains a variable or an expression, which is the basis for
branching. We will put the key input (waits to be pressed)
,
contains a variable or an expression, which is the basis for
branching. We will put the key input (waits to be pressed) ![]() element here. It will pass a numeric code of the key pressed to
the branching structure.
element here. It will pass a numeric code of the key pressed to
the branching structure.
Two connected elements follow — execute commands in case of ![]() and
expression is
equal to
and
expression is
equal to ![]() . This is one branch of
the construction. Into
expression is equal to, you
place a value, for which the commands in the branch will be
executed. There can be any number of branches, as well as any
number of values tested in a branch. Copy the whole of the execute commands in case of
. This is one branch of
the construction. Into
expression is equal to, you
place a value, for which the commands in the branch will be
executed. There can be any number of branches, as well as any
number of values tested in a branch. Copy the whole of the execute commands in case of ![]() branch for three more times.
branch for three more times.
Now we have four branches of the
construction. Into the tested value ![]() in the first branch, put the Up
in the first branch, put the Up ![]() key
code from the controls
key
code from the controls ![]() , keyboard
, keyboard ![]() , keys
, keys ![]() , control keys
, control keys ![]() group. This branch will be executed when you press the up arrow
key. Insert a step as the branch command
group. This branch will be executed when you press the up arrow
key. Insert a step as the branch command ![]() . We will ensure that Peter does not walk
through a wall. It is not necessary to check the sheet border;
Peter cannot run away from the sheet. Instead of a simple step,
we will use a conditional command. In the test, we will compare
items to see whether there is a wall in front of Peter. If there
is, nothing will happen. If there isn’t, Peter will make a
step.
. We will ensure that Peter does not walk
through a wall. It is not necessary to check the sheet border;
Peter cannot run away from the sheet. Instead of a simple step,
we will use a conditional command. In the test, we will compare
items to see whether there is a wall in front of Peter. If there
is, nothing will happen. If there isn’t, Peter will make a
step.
Into the following three branches, insert
the Left ![]() , Right
, Right ![]() ,
and Down
,
and Down ![]() keys as the tested values, and left
keys as the tested values, and left ![]() , right
, right ![]() ,
and turn about
,
and turn about ![]() as
the commands.
as
the commands.
The last element in the branching
construction is else
execute commands ![]() . As its name suggests,
the commands here will be executed, if the tested value is not
found in any branch. In our case, this element will be empty.
. As its name suggests,
the commands here will be executed, if the tested value is not
found in any branch. In our case, this element will be empty.
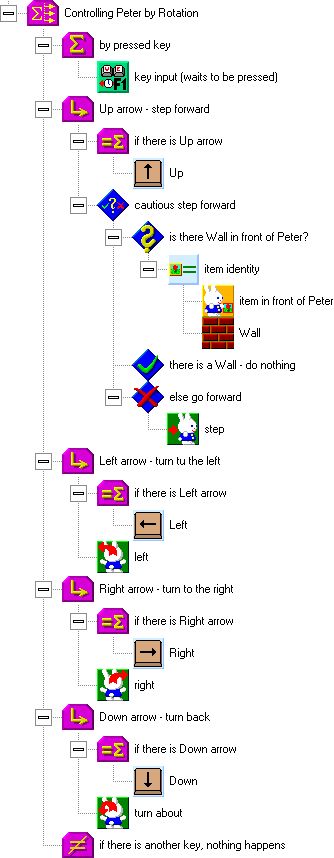
Run the program. Peter stands in the bottom left corner. If you try the cursor keys (arrows), you will see that Peter turns to the left, right, and back, and that he makes a step forward. You can lead Peter around the maze. When you get to the door, Peter turns to you, and the program ends after the next key is pressed.
This method of control is typical for cars. It is used when we need to turn an object exactly to a direction we want, and when the speed of movement around the sheet is not that important.
If you need to move quickly and easily, you can use the following method of control. It does not control the turns of the character, but walking in the direction of the arrow.
Using the right mouse button, copy the
previous branching construction once more to the bottom. Disable
the original construction by using the Turn Off ![]() button.
Label the new construction Controlling Peter by Directions. Delete the commands for turning to the right,
left, and back from the branches.
button.
Label the new construction Controlling Peter by Directions. Delete the commands for turning to the right,
left, and back from the branches.
We will edit the first branch of the
construction (for the up arrow) to make Peter turn up and make a
step. The step is already prepared. Inside it, there is a test of
a wall in front of Peter. The direction into which Peter turns
can be set by the direction ![]() element. It is located in Peter’s extensions. As a
parameter, add the up
(1/2 pi, that is 90 degrees)
element. It is located in Peter’s extensions. As a
parameter, add the up
(1/2 pi, that is 90 degrees) ![]() element from the calculations
element from the calculations ![]() group, angle, direction
group, angle, direction ![]() subgroup.
subgroup.
Create the direction setting commands in the remaining branches as well, changing the directions accordingly to the arrows. The command for the cautious step might be copied from the first branch, but we will use a function instead.
What is a function? Function is an element that contains a part of a program. Instead of several occurrences of the same part of a program, we will use a function to perform the part of the program several times. The program will be easier to read and modify.
To create a new function, drag the function ![]() element from the Library
of Variables and Functions
window into the Global
Variables and Functions
window. Label the function Cautious Step Forward. When you double-click the function icon, an empty
editing window appears, as the function does not contain any
command yet.
element from the Library
of Variables and Functions
window into the Global
Variables and Functions
window. Label the function Cautious Step Forward. When you double-click the function icon, an empty
editing window appears, as the function does not contain any
command yet.
We could create the step command in the
function, but there is an easier way, as it is already prepared
in the program. Switch back to the main program function (using
the Previous
Edit ![]() button), and find the conditional command
with the wall test and the step forward (it is in the branch for
the up arrow). Click the conditional command to highlight it.
Click the Copy
button), and find the conditional command
with the wall test and the step forward (it is in the branch for
the up arrow). Click the conditional command to highlight it.
Click the Copy ![]() button
(or press Ctrl+C on the keyboard). The highlighted part will be
saved in the clipboard for data transfer.
button
(or press Ctrl+C on the keyboard). The highlighted part will be
saved in the clipboard for data transfer.
Return to the Cautious Step Forward function (by clicking the Next Edit ![]() button). Click the Paste
button). Click the Paste ![]() button
(or press Ctrl+V). The transferred part of the program appears in
the window.
button
(or press Ctrl+V). The transferred part of the program appears in
the window.
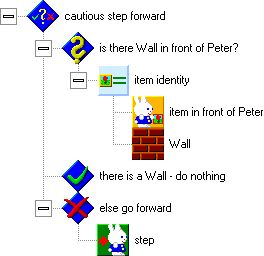
Now we can delete the conditional command from the branch for the up arrow, and replace it with the function for the careful step. We will also add it into the remaining branches behind the direction setting commands.
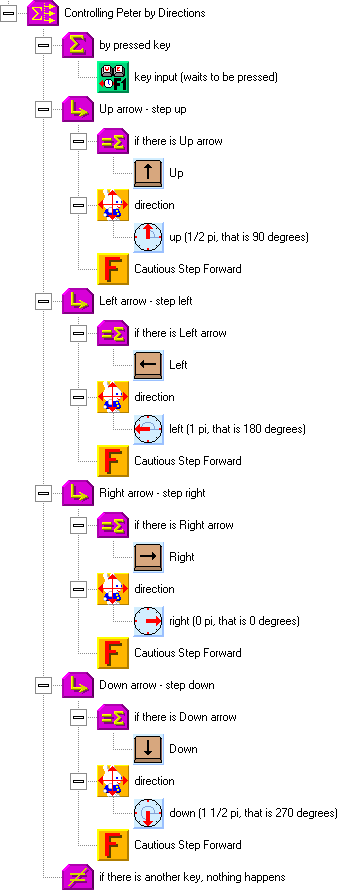
You can run and test the command. You will see Peter walking in the direction of the arrow pressed.
We will try one more method of control,
which can be used for more complicated and complex games. You may
have noticed that if you hold a key for a while in the previous
method, Peter walks on even after you release the key. This is
because the codes of the keys pressed are generated more quickly
than Peter walks, and so they are kept in the key stack. This can
be solved by the flush
out of key buffer ![]() command, which clears
the keys out of the stack. We will use it in the beginning of the
actions for every valid keyboard character, before Peter’s
steps.
command, which clears
the keys out of the stack. We will use it in the beginning of the
actions for every valid keyboard character, before Peter’s
steps.
Another thing that can be problematic in the previous two methods of control takes effect if you control quick actions or need to control graphics sharply. In the Peter sprite’s settings, try to change the Phases per Step value to 1 (after the test, return it back to 8). Peter will jump the squares quickly. If you hold the key on a longer free path, Peter jumps one square, waits a little while, and then jumps to other squares quickly. This is caused by the way that the keyboard generates codes — there is a pause after the first code, and then there are quick repetitions. This is useful when you write text, but may be a bit of a trouble when playing games.
Our request is that Peter should move when
we hold a key, without the initial pause, and without the inertia
after the key is released. This can be done by using the there is pressed key ![]() function from the keyboard
function from the keyboard ![]() group. The function tests if the appropriate key is pressed, and
returns a yes/no flag.
group. The function tests if the appropriate key is pressed, and
returns a yes/no flag.
First, click the Turn Off ![]() button
to turn off the previous method again. Under the method, prepare
a conditional
executing of commands
button
to turn off the previous method again. Under the method, prepare
a conditional
executing of commands ![]() element; you can call
it Controlling
Peter by Holding Keys. Into
the if valid
element; you can call
it Controlling
Peter by Holding Keys. Into
the if valid ![]() condition test, insert the there is pressed key
condition test, insert the there is pressed key ![]() element, and attach the Up
element, and attach the Up ![]() key
as its parameter. Into the then do
key
as its parameter. Into the then do ![]() branch, insert the
commands for making a step upwards, as in the previous control
method. The construction now reads: "If the Up key is
pressed, then turn up and make a cautious step, else test other
keys."
branch, insert the
commands for making a step upwards, as in the previous control
method. The construction now reads: "If the Up key is
pressed, then turn up and make a cautious step, else test other
keys."
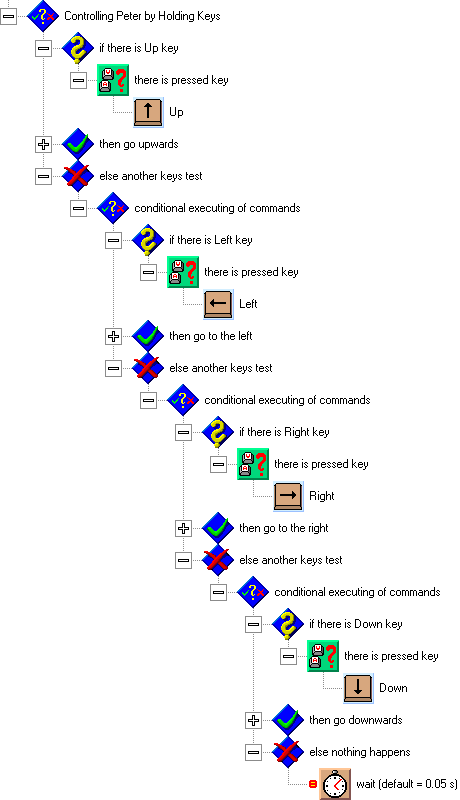
In the else do ![]() branch, create the
same construction, this time for going to the left. In its
invalidity branch, create a construction for going to the right,
and finally, create a similar construction for going down. Into
the invalidity branch of the going down construction, insert the wait (default = 0.05 s)
branch, create the
same construction, this time for going to the left. In its
invalidity branch, create a construction for going to the right,
and finally, create a similar construction for going down. Into
the invalidity branch of the going down construction, insert the wait (default = 0.05 s) ![]() command, which can be found in the program control
command, which can be found in the program control ![]() group. The small equals sign
group. The small equals sign ![]() in front of the icon indicates that there is an
optional parameter of this command, which means that it is not
necessary to add one.
in front of the icon indicates that there is an
optional parameter of this command, which means that it is not
necessary to add one.
Why a wait command? Windows is a multitasking operating system, which means that several programs can run at once. Each program should ensure that it does not consume an unnecessary amount of the computer’s performance. A good programmer can be distinguished by a considerate behavior of his or her programs in their environment. Advanced users can run the System Monitor program and monitor the load on the processor. An inconsiderate program consumes almost all of the computer’s performance, and causes the computer to be hard to control.
The picture shows the complete method of controlling Peter. The constructions for steps are collapsed, as we already know them from the previous method.
A disadvantage of such a long chain of conditions is that it can be hard to orientate in. We will try another possibility of building a similar construction.
Click Turn Off ![]() to
disable the last method. Copy the Controlling Peter by Directions method and rename it to Controlling by Holding Keys
2. The conditional
construction worked in such way that just one of the branches was
executed, depending on the key pressed. Delete the keyboard input
function from the for
value of expression
to
disable the last method. Copy the Controlling Peter by Directions method and rename it to Controlling by Holding Keys
2. The conditional
construction worked in such way that just one of the branches was
executed, depending on the key pressed. Delete the keyboard input
function from the for
value of expression ![]() element, and replace
it with the yes
element, and replace
it with the yes ![]() element (from calculations
element (from calculations ![]() , logic operations
, logic operations ![]() ).
).
In the tested values of the
individual branches, replace key codes with combinations of a key
code and the there
is pressed key ![]() element. Do the
following: Click the key code icon to select the key code
element. Click the Cut
element. Do the
following: Click the key code icon to select the key code
element. Click the Cut ![]() button
(or press Ctrl+X) to move the key code element into the clipboard.
Insert the there
is pressed key
button
(or press Ctrl+X) to move the key code element into the clipboard.
Insert the there
is pressed key ![]() element instead of the
key code element. Click the Paste
element instead of the
key code element. Click the Paste ![]() button (or press Ctrl+V) to attach the key code element to the pressed key
test. Finally, insert the wait (default = 0.05 s)
button (or press Ctrl+V) to attach the key code element to the pressed key
test. Finally, insert the wait (default = 0.05 s) ![]() element into the else
execute commands
element into the else
execute commands ![]() branch, so that the
program does not overload the computer in moments of inactivity.
branch, so that the
program does not overload the computer in moments of inactivity.
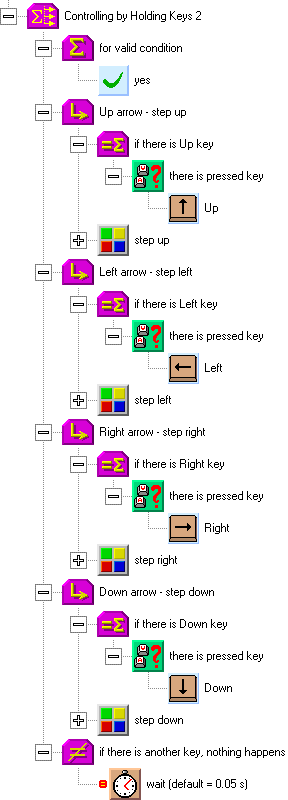
The resulting construction is on the following picture. How does it work? In the beginning, the program detects that there will be a test of a logical value of validity in its branches. It goes through the individual branches and searches for a matching value, that is, for a valid condition. It performs the commands in the branch it finds, and continues behind the end of multibranch structure (not paying attention to other conditions that might be valid, nor to other branches). In another words, the first (and only) branch with a valid condition (a key pressed) is performed, else the very last command is performed — wait.
