7. The Garden with a Condition <<< Contents >>> 9. Peter in a Maze
In another program, we will learn how to use conditional performing of commands. We will let Peter walk around the sheet, onto which we will put various marks. According to the marks, Peter will choose his direction.
First, we will create a new program. As you
sure remember from chapter 4, a new program is created by
clicking the New ![]() button
in the program window. The new program will be called Marks.
button
in the program window. The new program will be called Marks.
In the program, we will need two items that
will be used as marks. In the Global Variables and Functions window, copy (with the right mouse button) the empty square ![]() element into two new elements. Name them Left and Right. To remind you: You can assign a name by, for
example, selecting the element by clicking its icon, and pressing
Alt+Enter to edit the name.
element into two new elements. Name them Left and Right. To remind you: You can assign a name by, for
example, selecting the element by clicking its icon, and pressing
Alt+Enter to edit the name.
Put the new items into editing
mode by double-clicking their icons. Into the Left element, draw an arrow turned to the left; into the
Right element, draw an arrow turned to the right, e.g.
like this: ![]() and
and ![]() .
.
We will prepare the sheet. Double-click the
sheet ![]() element. In the editing window, the program sheet appears. We
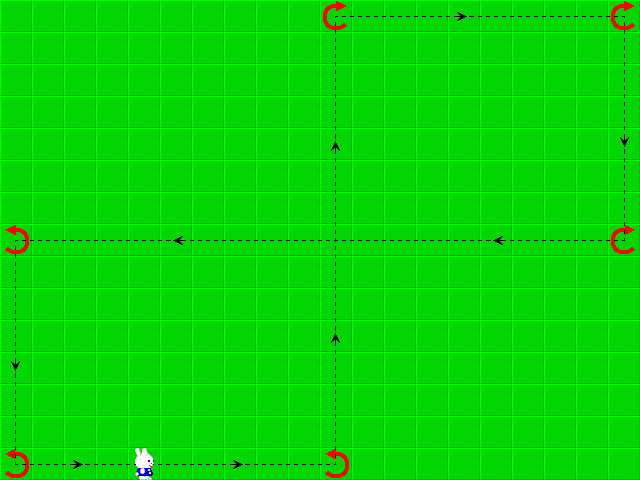
will create a path for Peter. Put the Left and Right elements on the sheet in such a way that Peter can
follow them in a closed track. Remember that Peter starts from
the bottom left corner to the right. To put the items on the
sheet, drag both of them from the Global Variables and Functions window to a place on the sheet first, and drop them
there. Then you can move the items with the left mouse button, or
copy them with the right mouse button. An item that is not
necessary can be deleted by moving it out of the sheet. The sheet
may look like this (Peter’s path is indicated by the dashed
line with arrows):
element. In the editing window, the program sheet appears. We
will create a path for Peter. Put the Left and Right elements on the sheet in such a way that Peter can
follow them in a closed track. Remember that Peter starts from
the bottom left corner to the right. To put the items on the
sheet, drag both of them from the Global Variables and Functions window to a place on the sheet first, and drop them
there. Then you can move the items with the left mouse button, or
copy them with the right mouse button. An item that is not
necessary can be deleted by moving it out of the sheet. The sheet
may look like this (Peter’s path is indicated by the dashed
line with arrows):

When the program sheet is prepared, we can
start to assemble our program. This time we will begin with the
main cycle. Peter has to keep moving along the marks, which means
that the program will be based on a never-ending cycle. For this
reason, we will prepare the conditional repeating of commands ![]() element. Actually, the cycle will not be never-ending; it will be
possible to end it by pressing the Esc key.
However, we will learn a few facts about the keyboard first.
element. Actually, the cycle will not be never-ending; it will be
possible to end it by pressing the Esc key.
However, we will learn a few facts about the keyboard first.
When a key on the keyboard is pressed, it sends its numeric code to the computer, which is something like a serial number of the key on the keyboard. The computer converts this code into a character, which can be passed to a program, e.g. as a letter or a number. In our program, not only the characters, but also the numeric codes of the keys are available. The function for character input is used for typing texts from the keyboard, as we know it from common writing of texts (e.g. holding Shift generates capitals). The function for key input serves for controlling programs and games (even control keys, like Ctrl, generate key codes, although they do not generate characters).
When a key is pressed, its character or code is stored in a stack. The reason is that when the key is pressed, the program might not be ready to accept it. When the program is ready, it accepts the key from the stack. The key is deleted from the stack then. When you use keyboard input functions, you have to remember that when you load the character or the code from the keyboard, it is discarded, and the next loading returns something else.
Characters and keys have separate stacks, which are independent of each other. They are as separate data flows. One channel is used for characters, the other for key codes.
Now we can prepare the condition for
quitting the main program cycle with the Esc key. We will use a function for the input of the
key code from the keyboard. We know that it returns a numeric
code, and so we will need a function for comparing numbers. Such
functions are located in the calculations ![]() group under comparisons
group under comparisons ![]() . We
will use the is
not equal to
. We
will use the is
not equal to ![]() function. Drag it into
the while is
valid
function. Drag it into
the while is
valid ![]() cycle condition.
cycle condition.
The first element to be compared is key input (does not wait for
press) ![]() . We will drag it to the comparative
function from the controls
. We will drag it to the comparative
function from the controls ![]() group, keyboard
group, keyboard ![]() sub-group. We have already used a similar element (waiting for a
key to be pressed) in the previous chapters. The difference
between these two elements is that this element does not wait for
a key to be pressed. If no key code is ready, it returns the code
of a situation where no key is pressed (it is the number 0, but we do not have to know the value, as we have a
no key pressed
sub-group. We have already used a similar element (waiting for a
key to be pressed) in the previous chapters. The difference
between these two elements is that this element does not wait for
a key to be pressed. If no key code is ready, it returns the code
of a situation where no key is pressed (it is the number 0, but we do not have to know the value, as we have a
no key pressed ![]() symbolic code).
symbolic code).
The second element to compare is the Esc ![]() key. It is into the same group as the key input function, but it
is nested deeper, under keys
key. It is into the same group as the key input function, but it
is nested deeper, under keys ![]() and
control keys
and
control keys ![]() .
This element is a numeric constant with the value of the Esc key code, which means that we do not have to know
the code. Put this element under the key input function element
in the comparative function.
.
This element is a numeric constant with the value of the Esc key code, which means that we do not have to know
the code. Put this element under the key input function element
in the comparative function.
What does the cycle do now? Read the notes besides the elements: "While it is valid that key input is not equal to Esc key, repeat commands (something)." This sounds rather complicated, but the meaning is clear, perhaps. The cycle will be repeated, until the Esc key is pressed on the keyboard.
Let us fill in the repeat commands ![]() cycle body. During his walk, Peter will decide his direction
accordingly to the square in front of him. The decision will be
made using a new element, conditional executing of commands
cycle body. During his walk, Peter will decide his direction
accordingly to the square in front of him. The decision will be
made using a new element, conditional executing of commands ![]() . It
is in the program
control
. It
is in the program
control ![]() group. Drag it into
the repeat
commands
group. Drag it into
the repeat
commands ![]() cycle body.
cycle body.
When you insert the element for conditional
execution of commands, you may notice that it contains another
three elements. The first one is if valid ![]() . It is a test of a
condition. We already used a similar element in the conditional
cycle. The element tests a condition, and if it is true, the
commands in the then
do
. It is a test of a
condition. We already used a similar element in the conditional
cycle. The element tests a condition, and if it is true, the
commands in the then
do ![]() elements will be executed. If the
condition is not true, the commands in the else do
elements will be executed. If the
condition is not true, the commands in the else do ![]() element will be performed.
element will be performed.
In the condition’s test, we will
detect if there is an item for turning left in front of Peter. We
know a similar test from the previous chapter, and so it is clear
that we will use the following elements: item identity ![]() , item in front of Peter
, item in front of Peter ![]() and
Left
and
Left ![]() .
.
Into the first branch (then do ![]() ),
we will put two commands, step
),
we will put two commands, step ![]() and left
and left ![]() .
The conditional command construction has this meaning now: "If
there is an item for turning to the left in front of Peter, Peter
will make a step and turn left, in other cases, he will do
something else."
.
The conditional command construction has this meaning now: "If
there is an item for turning to the left in front of Peter, Peter
will make a step and turn left, in other cases, he will do
something else."
Now we will create that "something
else". Using the right button, copy the whole
construction of the conditional command to a lower place. Drag
the newly created conditional command with the left mouse button,
and drop it in the second branch of the first conditional command
(the else do ![]() branch). This is a quick way to prepare the part of the program
for the second case, turning to the right.
branch). This is a quick way to prepare the part of the program
for the second case, turning to the right.
In the new conditional command, replace Left ![]() with Right
with Right ![]() . In
a similar way, replace left
. In
a similar way, replace left ![]() with right
with right ![]() .
Now you probably know what Peter will do if there is not an item
for turning left in front of him. He will detect, whether there
is an item telling him to turn right. If there is, he will make a
step and turn to the right. If not... What should he in fact do
otherwise? We do not want anything more; it is enough if he makes
a step
.
Now you probably know what Peter will do if there is not an item
for turning left in front of him. He will detect, whether there
is an item telling him to turn right. If there is, he will make a
step and turn to the right. If not... What should he in fact do
otherwise? We do not want anything more; it is enough if he makes
a step ![]() .
Copy the element for a step with the right mouse button from the
second branch of the condition.
.
Copy the element for a step with the right mouse button from the
second branch of the condition.
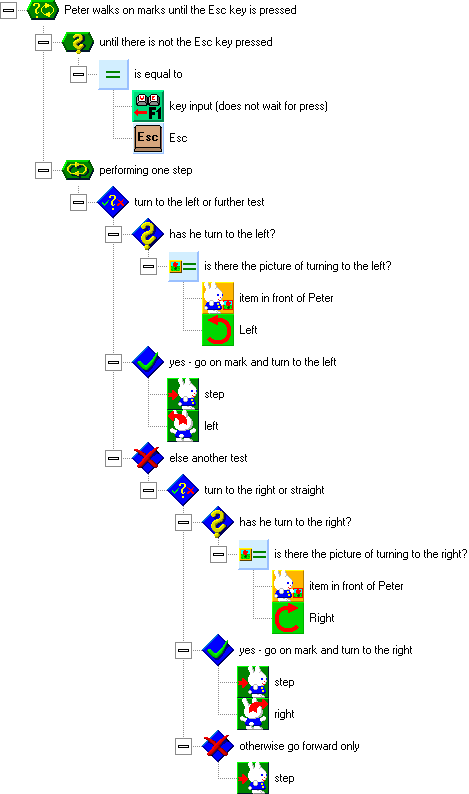
Did it look complicated? Don’t worry
— the program is ready (its picture follows). Run the
program. If everything is all right, Peter will run along the
marks and turn to the left or right on them. Do you want to make
Peter go faster? Double-click the Peter ![]() element to edit
Peter’s sprite. Click the Properties
element to edit
Peter’s sprite. Click the Properties
![]() button. A window
for setting the sprite properties appears. Into the Phases per Step field, type 4, and
then press Enter. Run the program again. Peter will run like crazy
now, but he will not gasp for his breath.
button. A window
for setting the sprite properties appears. Into the Phases per Step field, type 4, and
then press Enter. Run the program again. Peter will run like crazy
now, but he will not gasp for his breath.

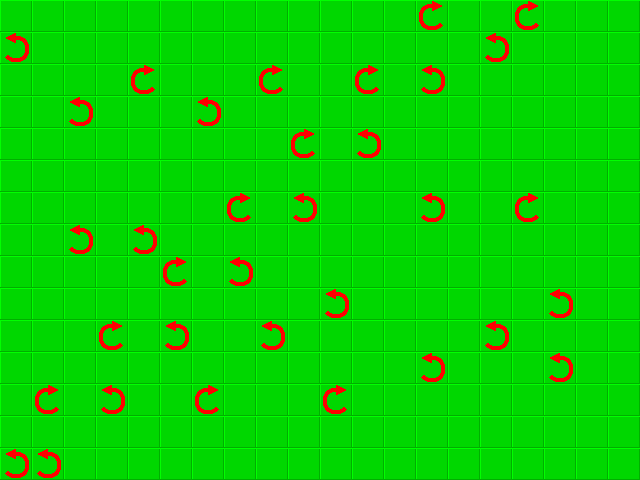
Try to prepare a more complicated track for Peter. Here is one example:

7. The Garden with a Condition <<< Contents >>> 9. Peter in a Maze